|
Installing Devices - CPU
Installing A CPU
-Installing a CPU can seem a little over your head but it isn't. It's actually easier than many components. The installation will probably take you 20 minutes with no problem. Now you will find CPU's in two flavors on modern PC's today. They will wither be in a Socket 7 format or SEC format for Pentiums. The SEC (Single Edge Connector) is fairly common and is much like installing a sound card or to the like. The socket 7 is a small square object with gold pins on the bottom. The socket 7 CPU will simply drop into the ZIF (Zero Insertion Force) socket and lock down. Boom... your done. Doesn't get my easier than that. If you are concerned about jumper setting on the motherboard refer to your motherboard manual. Now, lets get to the installation. Main idea of this install is take your time with it.
-ZIF socket
 |
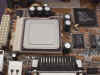
ZIF Socket |
-Socket 7 CPU
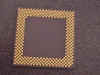 |
Socket 7 CPU, notice notch on CPU |
|
-Install-
-First off ground yourself. You do NOT want to allow a static electricity discharge on your new CPU. It will fry real quick! Make a habit out of touching the power supply in the case to discharge any amount of static electricity you may have.
-Unplug computer
-Open Case by removing screws. There are approximately 4 of them to remove.
 |
Unscrew Case |
|
-Remove case cover. Do so carefully so not to allow case cover to catch on a wire.
 |
Remove Cover |
|
-Take a peak into the case and at the motherboard. Identify what socket you will need. Most likely it is a Socket 7. IF it is a SEC connection such as a Pentium, make sure and install retention mechanism. This is screwed into the motherboard. Also you will have directions on assembly of your CPU if needed.
-After figuring out what CPU you have we need to install that dude. In this tutorial we install a Socket 7 CPU.
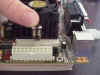
-First off pull the socket 7 locking handle into the up position.
| |
Picture same as above. Notice handle in UP position |
|
-Now we want to place the CPU in the ZIF socket. The CPU is notched at one end and is also notched on the ZIF socket. Simply align these.
 |
Take notice of notch in CPU. Align with ZIF socket |
|
-Make sure your CPU is matched up with slot and let it fall gently into the slot. If it wont slide in well then check pins on CPU to insure they are not bent. If one is bent you can use a pocket knife to straighten carefully. Be careful! If many are bent, take back to store and get a new one.
 |
Drop into ZIF socket gently. This picture is for illustration only. Do NOT put in at an angle! |
|
-Now with CPU in socket we need to lock it down. Push the handle all the way down and secure under its plastic retainer.
 |
CPU in socket with handle up |
|
 |
CPU locked in place |
|
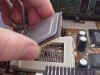
-Now we need to install the heatsink and fan. This is a snap literally.
-Take fan and heatsink which should be one piece and set on top of CPU. If you have some heat jelly for it go ahead and apply. Now, on the ZIF socket itself there are little plastic tanges that hold the side's of the heatsink clips. Hook one side on then clip other side down locking it in place.
 |
Installing HeatSink and Fan |
|
-Your Done!! Good job.. That wasn't so bad now was it. There is only one thing left to do and that is to hook up your CPU fan into a available power connector. Your BIOS should see new CPU and show it to you on the POST process.
 Back To Hardware Guides Back To Hardware Guides
Popular Articles:
How To Build A PC | Different Types of Keyboards | Help with Hard Drive Installation | Computer Networking Basics | Introduction of Motherboard Functions | Computer CPU Processor Speed | Upgrade from Windows 95 to Windows 98 | Computer Monitor Troubleshoot | Partition Hard Drive | Installing New CPU Processor | Types of Network Cables |


