-Installing a
new computer
CPU can seem a little over your head but it isn't. It's actually easier than many components. The installation will probably take you 10 minutes with no problem. CPUs were all similar up until recently. All AMD CPUs have pins attached to the CPU, Intel socket 478 CPUs also have the pins attached to the CPU. However, the new Intel socket 775 CPUs have no pins on the CPU, only holes, the pins are located on the motherboard itself. Intel chose this path for various reasons, mainly due to the fact the 478 "Prescott" processors produced to much heat.
The AMD and Intel 478 sockets are small square objects with gold pins on the bottom, and a lever to one side. The CPU will simply drop into the socket with the lever up and lock into place when the lever is down. Doesn't get my easier than that.
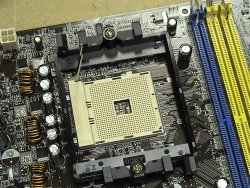
-AMD Socket (Also similar to Intel 478)
ZIF Socket
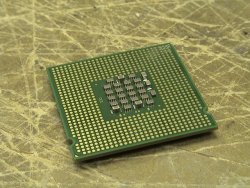
-AMD CPU (Also similar to Intel 478)
AMD CPU, notice notch on CPU
-Install-
-First off ground yourself. You do NOT want to allow a static electricity discharge on your new CPU. It will fry real quick! Make a habit out of touching the power supply in the case to discharge any amount of static electricity you may have.
-Unplug computer
-Open Case by removing screws. There are approximately 4 of them to remove.
Unscrewing the case
Slide case panel off the case
-After figuring out what CPU you have we need to install it. In this tutorial we install an AMD socket 754 CPU and after the new socket 775 Intel CPU.
Socket 754
-First off pull the sockets locking handle into the up position.
Picture same as above. Notice handle in UP position
-Now we want to place the CPU in the ZIF socket. The CPU is notched at one end and is also notched on the ZIF socket. Simply align these.
-Make sure your CPU is matched up with slot and let it fall gently into the slot. If it wont slide in well then check pins on CPU to insure they are not bent. If one is bent you can use a pocket knife to straighten carefully. Be careful! If many are bent, take back to store and get a new one.
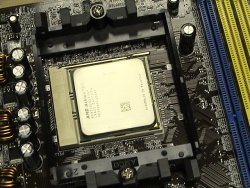
-Now with CPU in the socket we need to lock it down. Push the handle all the way down and secure under its retainer.
CPU locked in place
-Now we need to install the heatsink and fan. This is an easy job too tho.
-Around the socket there will be a black device that holds the heatsink down on the CPU, this is called the heatsink retention bracket. The heatsink itself with have two hooks on each side, with one side having a device that locks the hook in place while locking onto the retention bracket. Make sure the device is unlocked but turning it anti-clockwise before starting.
-Hook one side of the heatsink to the bracket and then lower the heatsink on the CPU. The other side of the heatsink should be able to hook into the bracket now also. The heatsink should feel firmly in place but the hooks will be loose. The final step is to move that locking device clockwise till it locks into the retention bracket, this should make the heatsink secure.
Installed HeatSink and Fan
-You're Done!! Good job.. That wasn't so bad now was it. There is only one thing left to do and that is to hook up your CPU fan into a available power connector. Your BIOS should see new CPU and show it to you on the POST process.
Socket 775
-As mentioned earlier Intel's new socket has its pins integrated with the actual socket and are not located on the bottom of the CPU. The new CPUs looks like this:
Look no pins!
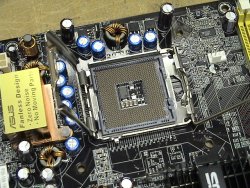
-The new socket has a protective cover on it to stop the pins being damaged. This will need to be removed first of all.
Socket 775 with protective cover on.
-Once the cover is off open the lever and lift up the metal flap. This reveals the pins and allows the CPU to be installed.
Socket open and ready for CPU to be inserted.
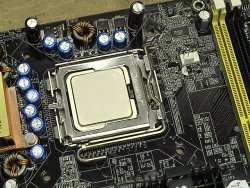
-As with all CPUs remember to look for the notch in the corner and match it up with the socket. Gently lower the CPU in the socket taking care to not bend any motherboard pins, and then lower the metal flap. Finally move the socket lever to the closed position to lock the CPU in the socket.
Socket closed with CPU installed, ready for heatsink.
-The CPU is now ready for the heatsink to be installed. This board is different in that it doesn't have a retention bracket. The heatsink simply slots into four holes. It is locked into place by twisting the four locking clips. Simply done.