|
Installing Devices - Hard Drive/Floppy
-Hard Drive-
If you are just plain tired of the drive you have and feel that you have outgrown it, it may be time for replacement. Now most of us will want to back up the information before changing over or even throwing information from one drive to the other. Now we need to figure out what steps to take before we put our new drive in.
 |
The Hard Drive |
-Back up, you will want to back up your data onto some source such as a CD-Writer, Tape backup, or even a Jaz drive. This will save your butt later. I promise. Click Here For More Information on backing up a Hard Drive.
-Choose a space, find a spot in the case you will want the drive to reside. Make sure its a place were the drive can get plenty of ventilation. Modern cases have their drive bays situated behind a fan of some sort to aid in the hard disk cooling. This is really important if running many drives.
-Hard disks come in two styles now, the newer SATA and the older ATA. There wasn't much difference until recently between SATA and ATA. Now improved firmware integrated in SATA hard disks improve the speed over ATA drives, also with the new SATAII disks starting to come out the woodwork, there is a boost for even more speed. Native SATA dives only accept SATA power that newer power supplies have, if not you can buy converters. A few SATA and all ATA drives take the standard 4 pin power connector that every power supply has in abundance. As well as different power cables, the data cables are different also, the pictures below shows the size difference.
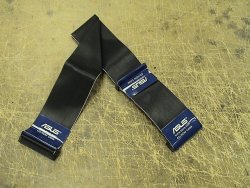 |
IDE data cable |
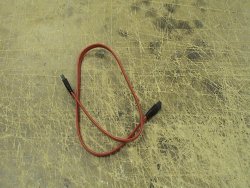 |
SATA data cable |
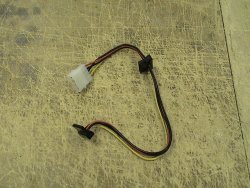 |
SATA power converter |
 |
Case is already marked for a hard drive. Find a similar bay in your case if possible |
-Check Cabling, insure the cables on your drive are in good shape and new. Its not a bad idea to replace your old cable on your existing hard drive as is. Make sure also that you have a spare power lead from the power supply.
 |
Replacing and installing IDE cable to hard drive |
-Setup the drive, if its to be a slave to another hard drive set the jumper accordingly. Look at drive documentation for more information. NB SATA drives can only be set to master/have no jumper as they have their own SATA port.
 |
Take note of the jumper on the hard drive, set to master or slave |
-The Steps-
-Turn the computer off and unplug it from the wall or power supply.
-Open the case by removing the screws and slide off gently.
 |
Unscrewing the case |
 |
Slide case panel off the case |
-Slide hard drive into the spot you picked.
 |
Slide hard drive into bay |
 |
Match mounting holes up |
-Secure drive with new screws that came with it.
 |
Tighten down hard drive |
-Plug in IDE cable. (line up the central notch on the cable with the back of the hard disk for the cable will not go in). If only one hard drive then just plug cable in from main IDE slot to the controller on back of hard drive. IF you are slaving the hard drive hook it up with ribbon cable of other hard drive. Make sure you have one set as the master and the new set as slave or vice versa. The IDE cables are also marked with a notch so to go only one way. NB SATA drives can only be set to master/have no jumper as they have their own SATA port.
|
Plugging in IDE cable to back of hard drive |
 |
Plugging in IDE cable to motherboard |
Plug in power connector.
 |
Hard drive (left) and Floppy drive (right) power cables |
-Boot up
-While in boot hit the "delete key".
-Go to your CMOS , look for drive settings. Make sure they are on AUTO for now. IF your system doesn't support AUTO then you will need to enter the values of your hard drive into CMOS. This can be done by referring to your manufacturer manual.
-If this new hard disk is being used a system without another bootable hard disk, then when you install Windows XP you will be forced to create a partition and format it, and then continue installing windows.
-If you are adding a new hard disk to an already setup and bootable hard disk, there is a program you can install in windows to configure the other drive. The program is called DiskWizard and is found on Seagate's website. It can convert the new drive to the new C: drive (bootable) or simply add it as a second hard disk, it partitions and formats in one go.
-If you would like additional information on installing a driver for your drive Click Here.
-Floppy-
 |
A floppy |
-Installing the floppy is pretty easy and doesn't take long. For the most part you can simply replace floppy and turn computer back on without trouble. Most of the drivers for it are generic as is.
-Turn computer off and unplug it from wall or power supply.
-Open case by removing screws and slide off gently.
|
Unscrewing the case |
|
Slide case panel off the case |
-Slide floppy into existing spot.
 |
Slide floppy in through case front |
-Secure drive with new screws that came with it.
-Plug IDE cable to drive and into motherboard.
 |
Backside of floppy |
|
Plugging in IDE cable to motherboard. This connector is smaller than the hard drive connector |
-Plug power connector into drive.
-Reboot
-You shouldn't have any problems with this especially if the system supports AUTO detection which most newer systems do.
-If you would like additional information on installing a driver for your drive Click Here.
 Back To Hardware Guides Back To Hardware Guides
Popular Articles:
How To Build A PC | Different Types of Keyboards | Help with Hard Drive Installation | Computer Networking Basics | Introduction of Motherboard Functions | Computer CPU Processor Speed | Upgrade from Windows 95 to Windows 98 | Computer Monitor Troubleshoot | Partition Hard Drive | Installing New CPU Processor | Types of Network Cables |


